


Eggs: Laying to Hatching
By Bill Strand
Citation:
Strand, B. (2003). Eggs: Laying to Hatching. Chameleons! Online E-Zine, March 2003. (http://www.chameleonnews.com/03MarStrand.html)
Those addicted to chameleons and wanting to experience the fascination of breeding are somewhat luckier than some of our other herpetological colleagues. We have some very nice livebearers to start off with. Most notable is the Jacksonii family of which many of us cut our chameleon teeth on. We were able to experience the joys of reproducing our gentle dragons without worrying about what to do with a bunch of white eggs that required many months of patience. If incubating eggs seems a daunting task then, hopefully, this article will guide you through the process as painlessly as possible! Most chameleon species lay eggs as a means of reproducing. And there are many truly wonderful experiences to be had to those skilled in egg incubation!
Before you Breed:
This article deals with the incubation process. There are some things that must be addressed before eggs get deposited, though. Keep in mind that the health of the gravid female is critical to getting good eggs to incubate! All during the period where she is gravid she must be given a nutritious diet. She must also have peace. Keep the gravid female out of visual contact with any other chameleon or animals she may consider predators (cats/dogs/birds/etc...). These should be considerations given to any chameleon in a captive environment, but know that making eggs places an incredible strain on the females body and that your best chances of a good clutch of eggs lies with a happy and healthy mother.
How to prepare for the eggs:
There is no one way to incubate eggs. I will present one method here that has proven to be successful, but bear in mind that this is just one of many ways that may work.
When I know eggs are going to be laid soon I get a clear plastic container with a lid ready. I use clear plastic so that I may view the eggs inside during the incubation period without opening up the container. I poke some holes in the lid so that there is some airflow. The holes are small and just enough that there is a very light ventilation. I fill the container with an inch or two of vermiculite and wait for the female to lay her eggs.
As I said, there are many methods that may be used instead. Some people just leave the eggs in the dirt were they were laid. Some people use dirt, sand or perlite as incubation media. All have worked and I know of no evidence that any works better than the other. Go to a breeder and they will be able to defend their selection of media with reasons that sound very convincing. Dirt is natural. Vermiculite is sterile. If they are left where they are buried then they do what they have developed to do. If they are extracted and put into a viewable box then they can be monitored. And back and forth it goes. The fact is that there is so much about incubation that we do not know that, once you get some experience under your belt, you should get creative, think for yourself, and experiment. There are no shortages of things still to be discovered and you may be the one to do it!
You must also determine where you will store the eggs during the incubation process. First decide on what temperature range you will need. A small amount of research will return some successful temperature ranges for the eggs of the certain species you are working with. Once again, keep in mind that the information you find is only one thing that worked. Never fall into the trap of thinking that the information you have is the ONLY thing that will work. Generally speaking, a temperature of 72 degrees F will work for most species. As room temperature seems to be good for chameleon eggs many people simply put their incubation containers in nothing more than their closet or bedroom drawer and get successful hatching. This provides a daytime high and a nighttime low. I have used an incubator that kept the eggs at 72 degrees throughout the entire incubation and have had success as well. You must evaluate your conditions and arrange for an incubation that produces the conditions that you have decided are needed for the particular species you are working with.
Digging out the eggs:
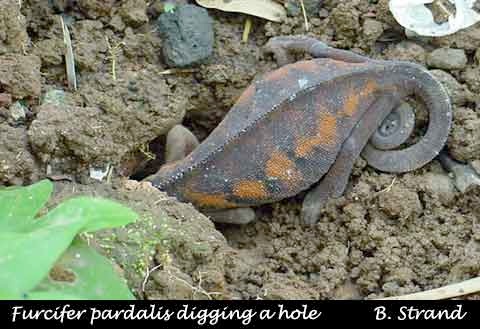
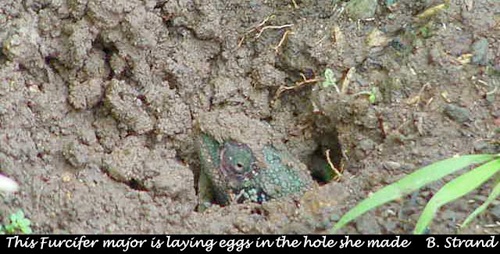
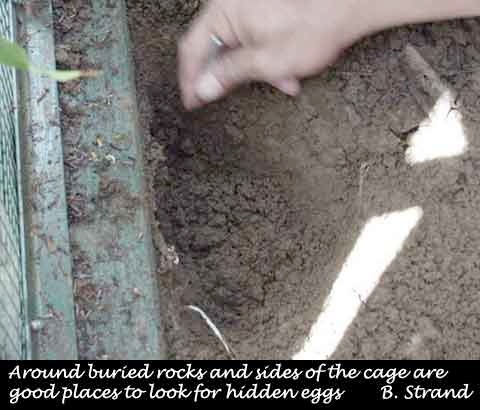
Before you dig out the eggs you need to know where the eggs have been laid. If you are presenting her with only one suitable laying spot then your job is pretty well done. But if you have provided multiple spots or have a dirt floor then you have a challenge proportional to the surface area of your dirt. The easiest way to do this is watch where the female lays them, of course! The trick is that if she sees you watching her you may disrupt her laying and stress her while she is feeling very vulnerable walking along the ground. One way to get around this is to build a blind around her cage. I once had a deremensis that was looking for a place to dig her hole. To watch where she finally laid I got an empty refrigerator box and poked eyeholes in strategic places. With this up I was able to check on her every half hour and see what was going on without disturbing her. If you keep your chameleons in a large outdoor cage and the chameleon lays outside then you have a task ahead of you. Get down on your hands and knees and start looking for disturbed dirt.
If you know the eggs have been laid and have decided to incubate them outside the laying media then gather your incubation container and wet the incubation media to the moisture level desired. Once again, there are many theories on how wet or dry the media should be. I use vermiculite and wet it until I can pinch the vermiculite between my fingers and my fingers come away moist. If I pinched the vermiculite between my fingers I would not be able to get a drop of water to squeeze out of it. To get the vermiculite to this moisture level pour in some water, mix the vermiculite up thoroughly, and then give the pinch test. If it is too dry add more water, mix, and test. If it is too wet add more vermiculite, mix, and test.
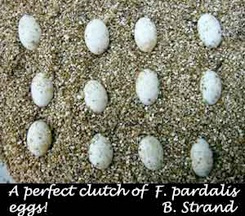
Once you have located the nesting site gently dig the eggs out. It will take patience, but use your fingers to dig. Do not get impatient and start to dig roughly or else you will get the heartbreak of crushing the first eggs. Using a digging tool can be useful, but I would suggest using one only when you have located the eggs and need to dig around them for good access. Once you have found the egg's location gently extract the eggs and place them in your incubation container. There is no reason to clean the dirt off of the eggs. Gently push as much off as will come off, but don't rub or wash the eggs. Place the eggs in neat rows in your container. I push them about half way into the incubation media.
The Eggs
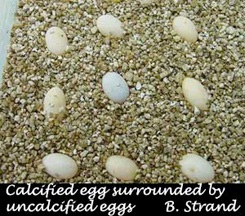
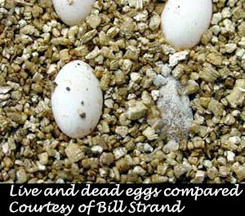
Now that you have the eggs in your container carefully examine them. Healthy eggs are white and have a firm hard shell around them. If your eggs are yellowed it is possible they are infertile. If they are leathery or soft it says that they are not well calcified. That being said, never throw out an egg unless you are positive it is dead! Every clutch looks a little different and there is no reason for you to make decisions you don't have to make. If the egg is dead it will mold up before long and it will be obvious to you.
The Wait
During the months of incubation it is a good idea to check on your eggs once a week until you get within a few months time of hatching (then every day is a good idea). The clear container comes in handy at the end when you are checking every day. This allows you to look for hatchlings easily. During the weekly checks you will be checking the moisture levels in the incubation container and taking out any eggs that may have died. I would also suggest having a thermometer that can record the maximum and minimum temperature your eggs have experienced. Record your findings every week and reset the thermometer for the next week. This record keeping will help you analyze your incubation. If you are successful you will know what works. If your eggs die you may be able to determine why (sudden temperature spike when the air conditioning went off, etc...) .
During your weekly checkup do the pinch test on the incubation media to make sure it maintains the level of moisture you desire. If things are too dry then close off some of the ventilation holes. If things are too wet then you can increase the ventilation. Add water carefully as it is no longer easy to dry it up if you put too much in! It has been said many times that one should not wet eggs directly. Getting some water drops on the eggs will not harm them. You must take care not to keep conditions too moist, but if the eggs are not getting any more wet than if they were underground when it rains, you are not going to hurt the eggs. Don't get too concerned about the eggs not being wet enough. If in doubt, err on the side of being too dry. Check the eggs every day while you are finding your moisture balance. If things are too dry your eggs will start to shrivel. That is your sign that there needs to be more moisture! But you can come back from this edge (as stated below). Having things too wet is much harder to recover from.
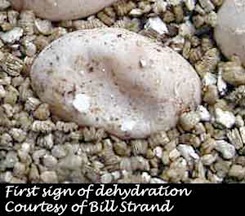
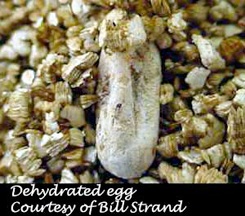
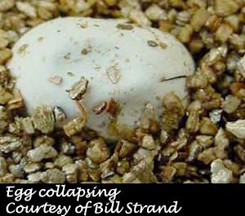
The main two things to watch out for during this long wait are dehydration and molding. A dehydrated egg will start to collapse in on it's self. The solution is simple. Moisten the area around it. The egg will soak up the moisture and go on incubating. I would not suggest this experiment, but it is amazing how dehydrated an egg can get and then pop back. The lesson here is to not throw out dehydrated eggs, no matter how bad they look, until you have given them a chance to come back. The dehydration signs will start as indentations in the egg and progress to the stage shown in the picture below.
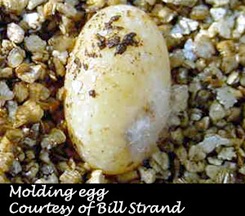
Mold is another problem. It is a sign that things are too wet inside the incubation chamber or that the egg is dead. I did have one egg that looked healthy all except for some mold starting on one side. I sprinkled athlete's foot power on it and the mold went away. The egg successfully hatched. Most of the time, the mold is merely what happens after the egg is dead. The dead eggs should be removed. Note in the picture below of the molding egg. It has a yellowish cast to it. This egg is not well calcified. The third picture below shows an egg far into the process of decay. It is common for some eggs in the clutch to be infertile or die while the rest go on to hatch.
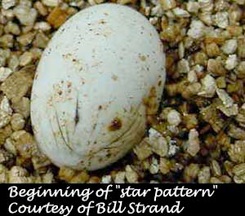
As the incubation goes on the eggs will slowly swell. You may notice a crosshatch pattern showing up as the thin outer layers of the egg flake away. This should cause no concern.
When the time gets closer to when you expect the eggs to hatch start checking on the eggs more often. The fact is that a F. pardalis clutch may hatch in six months or 12 months depending on the eggs and your incubation. There is nothing worse than checking your eggs and finding a clutch of dead babies. On the other side, don't give up on your eggs if they look healthy. You may not be giving the eggs the environmental triggers they need to proceed to the next stage of development and they will take longer. Some incubation triggers include controlling the moisture in the container to simulate wet and dry seasons found in the chameleon's natural environment as well as "show a diapause" which is the controlling of temperature to simulate the seasonal changes in temperature. There is much work that needs to be done in this arena as it has been indicated that a diapause period may be very important to species such as Furcifer lateralis and Furcifer minor. The currently accepted incubation period for Calumma parsonii of two years seems to many a suspiciously long incubation and it is not hard to find a number of experienced keepers that feel this is more an artifact of our lack of understanding of incubation requirements than a true natural phenomenon. But even if you do not provide these triggers, the eggs may hatch out any ways - just some unpredictable time in the future! Don't give up. As long as the eggs are healthy keep them incubating.
Hatching:
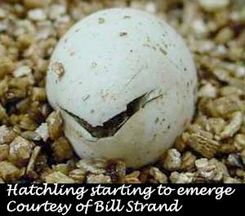
When the egg is ready to hatch it will start "sweating". You will see water droplets forming on the outside of the egg. A "star" shaped pattern will begin to appear at one end of the egg.

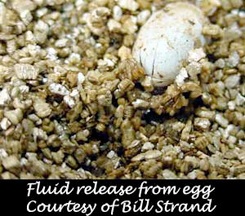
A short time later (same day) you may notice the end of the egg slitting open and a wet area by the slit. This is from fluid inside the egg being released by the hatchling's slitting of the egg. It is difficult to distinguish from the picture, but look carefully and you will see a darkening of the vermiculite that is clumped together. The egg may start to collapse. This is normal.
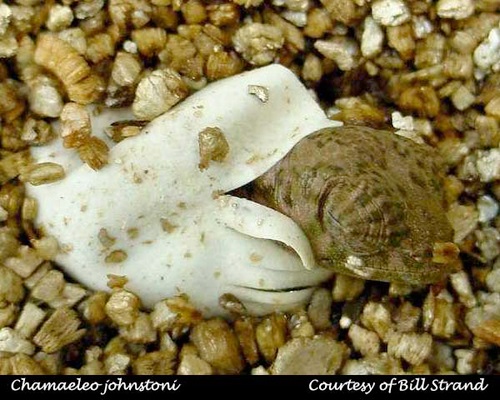
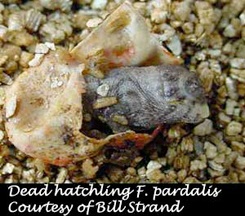
The entire hatching process may take less than an hour or a couple of days. A couple hours from slitting to a baby crawling around is standard. This is hard work for the baby, so be patient. You will notice the baby struggling and then resting. The stronger the baby is the less resting it will do. Should you have a baby that takes more that a day to fully emerge you may have to help the baby hatch. Carefully make one of the existing slits longer. Unfortunately, there are those babies that just are not strong enough to go full term. Some babies get as far as slitting their eggs and then go no further. The picture below is of a panther chameleon that got as far as slitting it's egg, but died after that. The egg has been carefully opened up to show the full term neonate inside. The reasons for this are many - but hard to know for certain. If your entire clutch failed then you have to examine your incubation temperatures/moisture/etc...to see where you may be able to do better next time. Do not discount the possibility that the problem may be at the beginning in the husbandry of the female. To produce healthy eggs the female must be healthy. Consider her exposure to UVB, her intake of calcium, her stress levels during her gravid period, her overall health, etc...
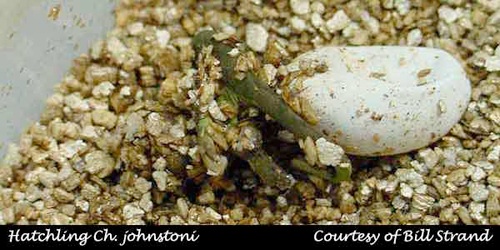
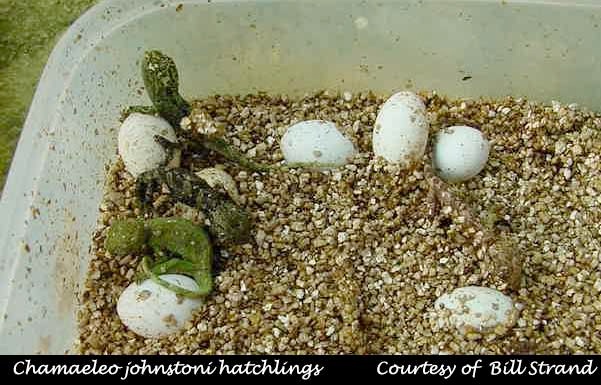
Hopefully, most of your eggs will hatch! In this case you will find many hatchlings clamoring about the container in various stages of being covered with incubation media. Usually the incubation media will fall off on it's own, but a gentle squirting of water will help stubborn pieces come off. It is common for artificially incubated clutches to hatch over a long period of time between the date the first egg hatches to the last egg. Once again, don't give up on eggs as long as they are still good!


What Now?
Your chameleons come to you ready for action. Once they get their bearings in this new world they will be searching for food. Make sure you have cages ready for them and food available!
Conclusion
Incubating eggs is truly a simple thing to do. Like anything it requires a sharp mind to trouble shoot problems, but remember that eggs were designed to hatch in the wild. If you give them the basic conditions (easily found in books) and monitor them (as shown in this article) your main challenge will probably be the care of a bunch of tiny mouths wanting to be fed! That, of course, is a book in itself!

Bill Strand

Bill Strand currently works in the area of exotic animal breeding and continues to refine husbandry techniques with a broad range of chameleon species. A special interest of his is the creation of captive environments. He was the Assistant Editor and Webmaster of this Chameleons! E-Zine from March 2002-March 2004.


Join Our Facebook Page for Updates on New Issues:
© 2002-2014 Chameleonnews.com All rights reserved.
Reproduction in whole or part expressly forbidden without permission from the publisher. For permission, please contact the editor at editor@chameleonnews.com
