


Indoor/Outdoor Automatic Misting System
By John Lucas
Citation:
Lucas, J. (2004). Indoor/Outdoor Automatic Misting System. Chameleons! Online E-Zine, January 2004. (http://www.chameleonnews.com/04JanLucas.html)
Indoor/Outdoor Automatic Misting Systems
Misting plays a key role in keeping a happy healthy chameleon(s). Misting helps to maintain humidity, flushes out eye irritants, provides a water source, and benefits your live plants. There are many different ways of misting. Some of us use a hand mister/spray bottle, some use a pressurized plant sprayer, and some use an automatic misting system. Most who have only one or two cages to mist will use a hand spray bottle. Try that with more then a few cages three plus times per day everyday and your hands will be in pain. Automatic misting is a very useful and effective way of misting multiple cages all at the same time, every day hands free. This relieves the stress of you having to do it manually and remembering when to do it. There are a few brands of packaged automatic misting systems and there are home made DIY (Do It Yourself) systems.
An automatic misting system may not be for everyone. If you only have one or two chameleons to care for you may not see a need for investing in one. When you have multiple cages, an automatic misting system is an invaluable part of your setup. An automatic misting system also works great in case you have to leave town for a few days or go on vacation. Chameleons can go with out food for days, but daily hydration is critical for health. This way your sitter only needs to feed your chameleons not mist them 3+ times per day. This is where the automatic part of the system comes in to play. The system will turn on and off with or without you being home. I am going to go in to detail on how I have my indoor and outdoor systems put together.
Indoor Auto Mister
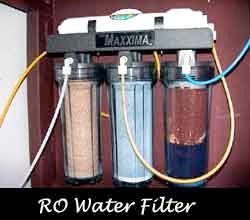
The indoor system I use is a pre-made kit, the Rainmaker Jr. ™ with added nozzles and tubing to what comes with the kit for all my cages. These kits are very easy to set up, and are worth every penny in my opinion. I have my system hooked up to be fully automated, so that misting is automatic and refilling the reservoir is automatic, 100% hands free. I use a RO/DI water filter system to refill the reservoir. This is connected to a solenoid valve that is controlled by a float switch.
Supply List:
1. A Rainmaker Jr. ™ misting system
2. Extra nozzles (the kit come with two, you need one for each cage)
3. Extra Tubing (the kit comes with 10 feet) you can also buy extra tubing from home improvement stores.
4. RO or RO/DI water filter
5. Extra RO water line for intake water, waste, and filtered water. (Filtered and waste line optional.)
6. Adapter to water source for water line to water filter (Depending on the source you tap you will be using PVC/copper fittings or just copper fittings.) I used PVC/copper fittings, source is a ¾" PVC pipe that used the following fittings 1- ¾" T, 1- ¾" slip ball valve, 1- ¾"slip X ½" MPT adapter, 1- ½"FTP X ¼" water line copper adapter.
7. Small can of PVC glue
8. Float Switch
9. Electronic solenoid valve
10. 5/8 drill bit
11. 2 - large 3/8" washers per misting nozzle
12. Roll(s) of Teflon tape
Tools
1. Drill
2. Flat head screw driver
3. PVC pipe cutters
Step 1
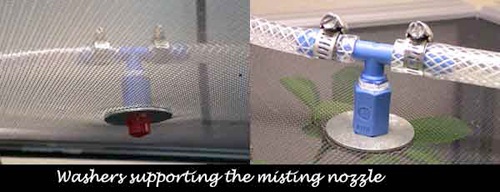
First thing is to set up the misting system to the cages. This includes one misting assembly for each cage and enough tubing to connect all the misting assemblies together to the pump and then to the reservoir. The system will come with instruction on how to set it up, just make sure you buy any extra nozzle assemblies and tubing if needed when you purchase the system. Do not connect the pump to the reservoir yet. When installing the misting nozzles in each cage, cut a small hole about 3/8" in the center top of the cage. Put one 3/8" washer on the misting nozzle and put the nozzle through the hole you made in the cage. The nozzle and the washer should be on the inside of the cage. Then place a second washer through the misting nozzle on top of the cage. So you should have one washer inside the cage and one outside on top of the cage. The screen of the cage is in between the two washers and the misting nozzle through the two washers and screen. Then just attach the misting nozzle to the rest of the nozzle assembly. This will help support the nozzle and keep it in place upright. (See photo)
Step 2
Before you connect the pump to the reservoir you will need to drill a 5/8" hole in the side wall of the reservoir. Follow the instructions that come with the float stitch to install it. This will determine where the water line from the water source will need to go. Then connect the pump to the reservoir. (See photo)

Step 3
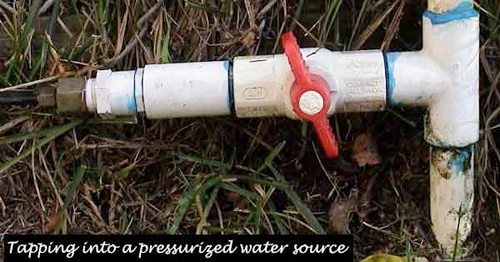
You will need to tap into a pressurized water source. This would be any water pip near by with easy access, or water faucet where you can add an adapter for the water source. The adapter will need to allow for a ¼" OD water line (same type of tubing used for icemakers). Every setup will be different because where I draw my water from will be different from where you do yours. For this reason you are on your own for this part. Home improvement stores will sell adapters for icemaker water lines this is the same thing you will need for this system, you will need to adapt down to ¼" tubing. Remember to turn your main water line off before you cut any pipes, and have a bucket near by to drain the pipe in. You will need a very basic knowledge of plumbing for this part. The photo provided is of a PVC source using the parts in the supply list. (See photo)
Step 4
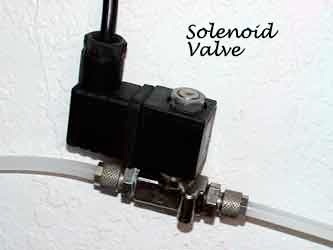
After you have the adapter in place run the ¼" main water line to the misting system. Attach the solenoid valve to the main water line you just ran to the misting system. If you are going to use tap water for your system then you will need to only attach the main water line to the reservoir. If you are using a RO or RO/DI water filter, then you will need to follow the instructions that come with the filter. This will require you to attach the main water line to the filter and then run a waste water line to a drain and the filtered water line to the reservoir. The solenoid is controlled by the float switch, so it will need to be installed near the float switch. The basic way the float switch works is like a light switch, makes and breaks the electrical circuit. The float switch is connected to an extension cord that is plugged in to an electrical source, and the solenoid valve is plugged into the extension cord. (See photo)
Step 5
Make sure all connections are tight. Turn back on your main water source, and plug the float switch in to your power source. Allow the reservoir to full up; the water will automatically shut off when the reservoir is full. Then plug in the pump to the timer that you programmed to turn on and off automatically at the set times, and then the timer to the power source.
Now you're all setup with a fully automatic misting system. You do not need to use a RO or RO/DI water filter. I happened to have one already so I used it. I also have very hard water and the filtered water keeps the small nozzles from clogging. See a past EZine article on Water for more information. You can find the float switch and solenoid valve at www.customaquatic.com . You can also find RO or RO/DI water filters at www.customaquatic.com , home improvement shops, and www.championlighting.com .
I use the Rainmaker™ system because it is well put together. Some of the features I like are the larger 5 gal reservoir, metal clamps (not zip ties), plumbed with outtake for the pump with a bulkhead on the bottom side of the reservoir, stronger pump, stronger threaded tubing, and better nozzle assemblies. The extra money these systems cost compared to there competitor is well worth it in my opinion. You can buy the Rainmaker™ systems direct from the manufacture over the net at http://www.cloudtops.com/misting_systems.htm .
Tips
1. Double the amount of Teflon tape on all misting assemblies to prevent leaks.
2. If you get a leak in the misting nozzle use a bead of aquarium silicone to make a seal. If at any time you need to replace/clean the screen in the nozzle the silicone will come right off.
3. Try to keep the water line connected to each misting nozzle at the same height to prevent back siphon.
4. Wrap the pump with a towel to quite any excess noise from vibrations when the pump is on.
5. If you choose to use a RO or RO/DI water system cut a small hole in the lid of the reservoir for the filtered water line and keep the lid sealed. This will keep out dirt, dust, insects, and so on. Check the reservoir now and then to make sure it stays clean.
6. Keep the reservoir in a dark area; this will prevent growth of algae and bacteria. You can add a small 50w submersible heater to the reservoir for a warm mist.
Outdoor Auto Mister
The outdoor system consists of parts that can be bought at your local home improvement store. All items can be easily found in the plumbing/irrigation section of the store. This system relies on the water pressure in your water line. There is no pump with this system; it is controlled by a digital water timer (electronic control valve). This system can mist up to 4 times per day and from 1-60+ minutes per misting duration. The only requirement to use this system is that you have access to a water faucet.
Supply List
1. Roll of ¼" garden tubing, comes in 50 foot and 100 foot rolls
2. Hose/faucet adapter for the ¼" tubing
3. One ¼" elbow
4. One ¼" T for every misting nozzle
5. One misting nozzle per cage (see photo)

Tools
1. Scissors
Step 1
Connect one end of the tubing to the faucet adapter. Connect the faucet adapter to the faucet. Then run the tubing to the first cage. Cut the tubing after you have it in place for the first cage.
Step 2
Attach a "T" fitting to the cut tubing and connect the extra tubing to the other end of the "T" fitting. Run the tubing to the next cage and do the same. Once you have run all the tubing and connected all the "T" fittings, you will need to attach the "L" fitting to the last cage.
Step 3
Cut a 1" piece of tubing for each fitting to attach the misting nozzle to. The misting nozzle should be the last piece you add. So attach the 1" pieces to the fittings above each cage first.
Step 4
Attach the misting nozzles to each cage, the nozzles I use are threaded and should be screwed into the tubing not pushed like you would have done with all the other fittings.
Step 5
Program the water timer to your needs, you can add some Teflon tape to the fitting on the timer, this is optional. Then disconnect the adapter from the faucet, and attach the automatic water timer to the facet. Then reattach the adapter to the timer. The reason I do it this way is because the faucet is a lot stronger then the timer and it will prevent you from accidentally breaking the timer when running the tubing to the cages.

Step 6
Make sure all the fitting are tight and in place. Turn on the water faucet and leave it on. The timer will act as the control valve and turn the water on and off at the pre set times you programmed into it.
This system will produce a fine mist. The misting nozzles are rated at 0.5GPH (gallons per hour). If you have a hard time locating any of the parts just email me. You should be able to run 20+ nozzles with this system. If you need to run more then that all you need to do is up grade the size of the water line. The screen I use on my outdoor cages is a ½" PVC coated hardware cloth so there are no issues with attacking the nozzles to the cages. If you use a smaller screen just cut a small hole in the screen and slip the tubing through, the fit should be tight. You can also use this system indoors you will just need a place to attach the water timer to.
Tips
1. You can control the amount of water pressure with the facet valve
2. If you need to control the misting nozzles you can buy ¼" control valves.
These two systems have worked great for me. The misting durations will differ from user to user. Play around with the system till you find what works best for you. With misting comes excess water, so you may consider adding a collection tub to your setup if you find you get a lot of excess water. This can be as simple as a plastic pre made tub to a custom built acrylic tub. You can find a large selection of tubs at superstores; you should be able to find something that will work for your setup.

Allison Banks

Allison Banks is currently a wilderness management planner for Glacier Bay National Park and Preserve in SE Alaska. She has a degree in wildlife Biology and Management from Oregon State Univeristy and has worked for the US Fish and Wildlife Service for about 15 years in National Wildlife Refuge System management and endangered species recovery programs. She started her chameleon addition in 1994.


Join Our Facebook Page for Updates on New Issues:
© 2002-2014 Chameleonnews.com All rights reserved.
Reproduction in whole or part expressly forbidden without permission from the publisher. For permission, please contact the editor at editor@chameleonnews.com
