


DIY Versatile Cage Designs
By Christopher V. Anderson
Citation:
Anderson, C.V. (2006). DIY versatile cage designs. Chameleons! Online E-Zine, September 2006. (http://www.chameleonnews.com/06SepAndersonDIY.html)
One thing that has always annoyed me about commercially produced enclosures is their lack of versatility. They don't allow you any flexibility in their size or use and in many cases this limits your ability to work with certain species because of housing constraints or limits how effective your breeding efforts can be. After throwing around complaints about our own setups and talking about things we wish we could do, Jason and I came up with an idea on a cage design that we hoped would fix some of these problems.
We wanted to be able to have large enclosures without wasting space when they weren't needed and we wanted to have small enclosures without being limited to only small species. We also wanted to introduce pairs for breeding without the stress of removing one of the two from their territory. It became obvious that we could accomplish this if we had large caging units with removable dividers to partition the unit into smaller enclosures if we so desired. The only problem was how we were going to do it so that the enclosure was sturdy, didn't cost too incredibly much to build and would be easy for people to locate supplies for to replicate. We came up with two designs that could be used for different purposes and I went off to build these two enclosures for myself.
The premise of the enclosure was to use corrugated plastic, cut so that the internal supports went horizontally, as removable dividers. These dividers would slide into the cage unit from the top between two boards spaced apart such that the plastic would slide down easily. The purpose of the corrugated plastic with horizontal internal ribbing is so that the plastic can be bent without damaging the structural integrity of the plastic and allowing the pieces to be inserted and removed with limited space above the enclosure.
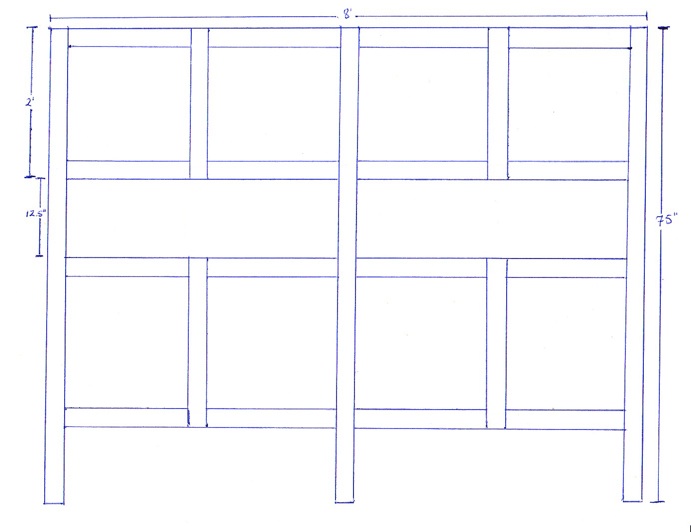
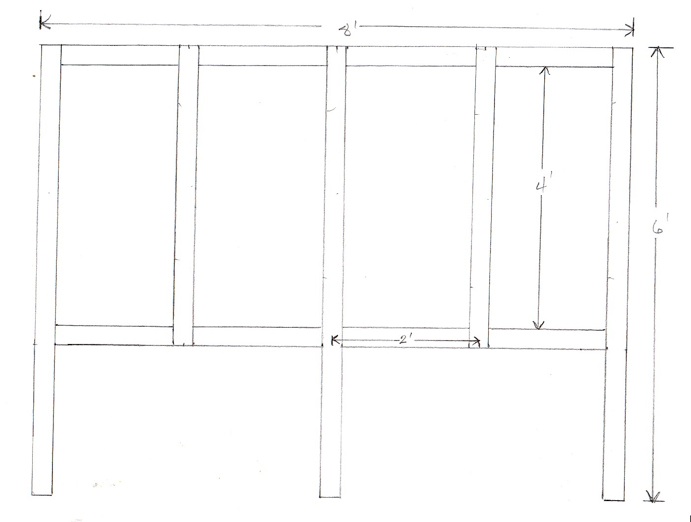
From the above plans for the frames of the two enclosure units we designed, you can see that we decided 8' long 2x4s would be a sturdy, affordable and consistently available material to base our cages on. At this point, we realized that for such an enclosure to work properly, it would be very important to find straight 2x4s which can be difficult in untreated pieces. Further, untreated pieces would need to be stained and sealed to protect from water damage. For this reason, we decided to use pressure treated 2x4s.
There is a great deal of confusion about the toxicity of pressure treated wood. Previously, wood was treated with chromate copper arsenate (CCA) which is highly toxic chemical pesticide. Recently, however, the industry has moved away from CCA use in residential applications and the majority of available treated wood is treated with either alkaline copper quat (ACQ) or copper azole (CBA-A or CA-B). These treatments are far less toxic and are considered to be a much safer material. It should be noted that keepers have kept chameleons in CCA wood enclosures for years without ill effects and the same is true of ACQ and CA-B wood enclosures. At the same time, when using such wood for your enclosures, you should be sure to allow the wood ample time to dry out after you buy it and you might consider sealing the wood as an added precaution.
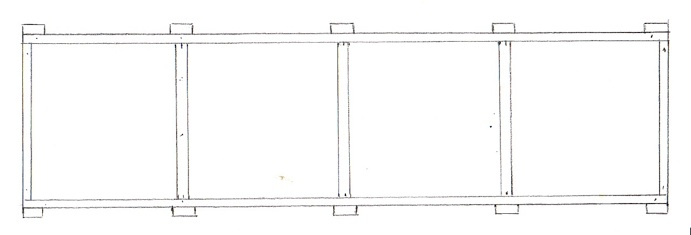
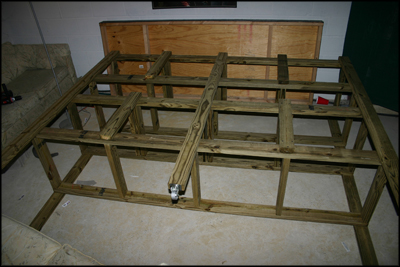
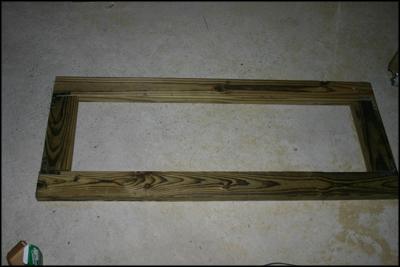
The first step in building either enclosure is to build the top and bottom pieces for each cage unit level. In order to get accurate angles when attaching pieces together, I used 90 degree vice clamps to hold the pieces in position as while I used 2 1⁄2 inch deck screws to secure the pieces together. With 8' long 2x4's, I wanted to create 4 enclosures along this length with square base dimensions. As a result, the wood sections connecting the two 8' 2x4s were cut to 21 inches to account for the 1.5 inch thick 2x4's on each side.
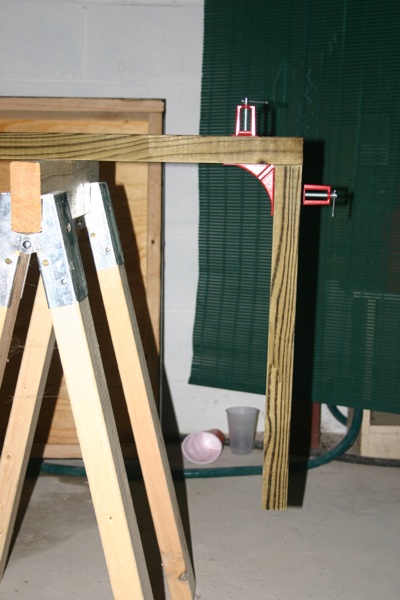
Use of 90 degree vice clamps when building the top and bottom frame pieces. The frame outer perimeter is made of two 8' 2x4s and two 21” 2x4s.
Once the outer perimeter of the bottom frame piece is built, three additional 21” sections are secured in the center of the frame spaced equally apart. Remember if you are building the double leveled enclosure, you'll need to build two bottom frame pieces, one for each enclosure level.

Three additional 21” pieces should be secured within the outer frame at equal distances. This photo shows the first of the three additional pieces being secured.
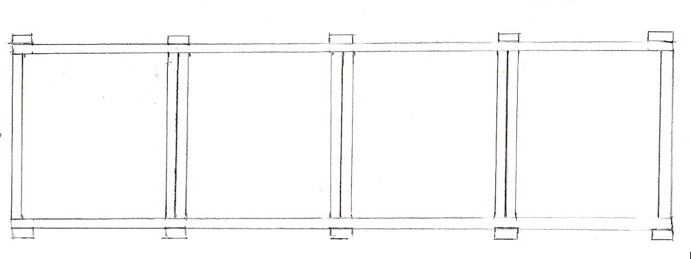
The outer perimeter of the top frame pieces are created just like the outer perimeter of the bottom frame pieces above. However, rather then placing three additional 21” pieces evenly spaced, you need to place three pairs of 21” pieces such that each pair is spaced just far enough apart for the corrugated plastic to slide between them. Again, if you are building the double leveled enclosure, you'll need to build two top frame pieces.
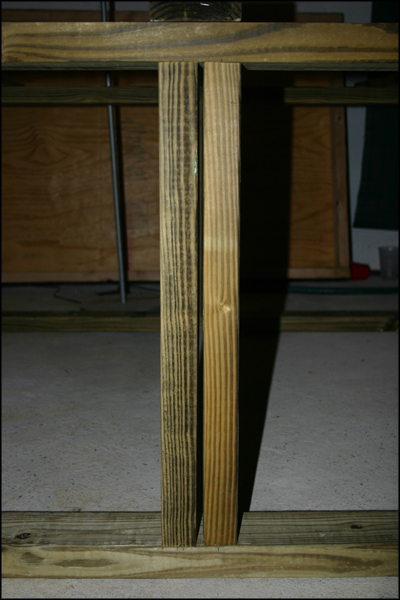
Pair of 21” wood pieces spaced to allow corrugated plastic to slide between them.
Once the top and bottom frame pieces have been built, you are ready to set them on their side and attach the vertical frame supports and legs. For the single level enclosure unit, you'll have thee 6' and two 4' pieces to attach as shown in the plans.
Top and bottom frame pieces connected on one side with the two 4' vertical frame supports and the three 6' vertical frame support legs.
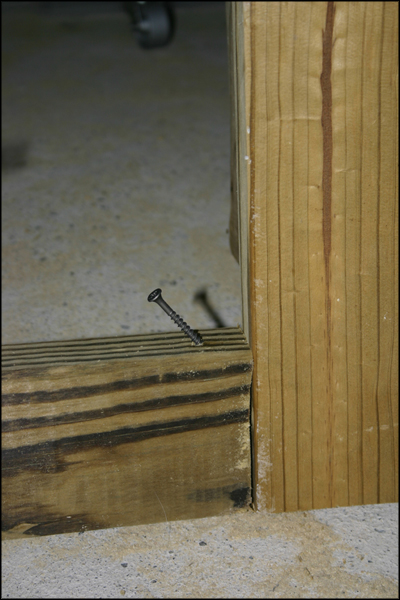
At this point, I recommend using the two 4' vertical frame support pieces for the other side to secure the other side while you flip the enclosure. This will maintain the stability of the enclosure and if you attach them with a screw from the inside, will leave no visible extra holes when they are removed.
Frame support attached while flipping enclosure.
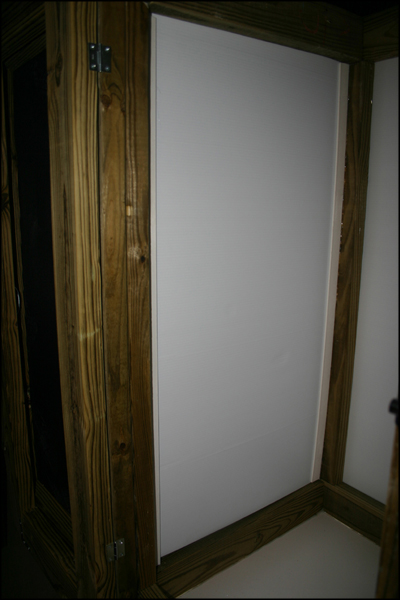
Once you've attached the boards to support the frame during flipping, you should flip the enclosure so that it is standing upside down on its top. This will allow you to easily attach a 2'x8' piece of 1/8” expanded PVC board to the bottom.
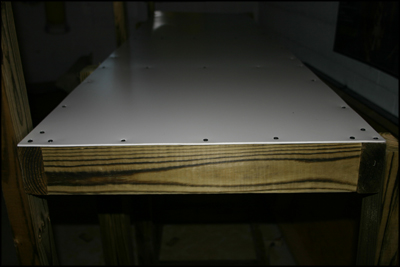
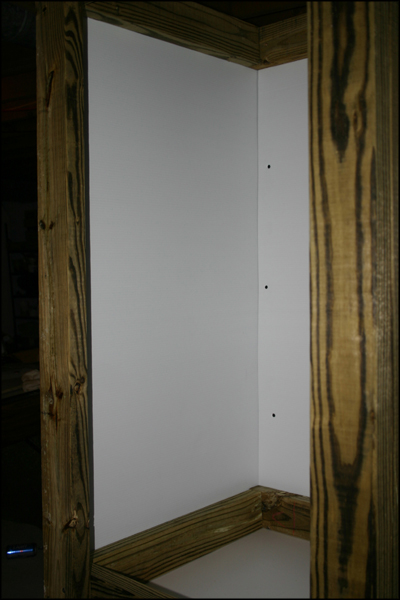
A 2'x4' piece of 1/8” expanded PVC board attached to the bottom of the enclosure.
In attaching the bottom piece of plastic, you'll want to make sure to securely fasten it along the three central cross supports as well as the outer frame.
You should now flip the enclosure so that you can begin to attach the vertical frame supports and legs to the other side. Once you flip the enclosure, you will need to remove the supports you secured for flipping. You will then need to place a piece of 4'x8' corrugated plastic on the back between the frame pieces and the vertical frame supports and legs. This will create a solid back to the enclosure. Since the solid back will not need to support weight and the corrugated plastic is cheaper then the expanded PVC, I recommend using this material for the back. Once you've placed this piece on the back, you can attach the three 6' legs and the two 4' vertical frame support pieces as you did for the front.
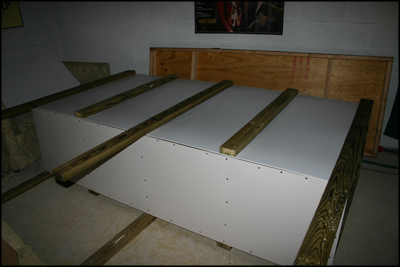
A 4'x8' piece of corrugated plastic is placed between the frame and the vertical supports to create a solid back to the enclosure.
I recommend attaching casters to the bottom of the 6 legs while the enclosure is on its side as the finished enclosure is very heavy and the casters will aid in moving the cage once it is finished.
Once the cage is standing upright, you will notice that when you insert the corrugated plastic dividers, there will be a gap on both sides. As a result, you will need to insert an additional piece of 2x4 to fill these 6 gaps. Each piece of 2x4 should need to be 41” to fit in this spot.
Gap filling on the front side where the corrugated plastic dividers will insert.
Gap filling on the back side where the corrugated plastic dividers will insert.
You can them attach a piece of 4'x28” corrugated plastic to each end of the enclosure using 1 5/8” deck screws. This will make give solid sides to the sides of the enclosures.
A piece of 4'x28” corrugated plastic attached to the end of the enclosure.
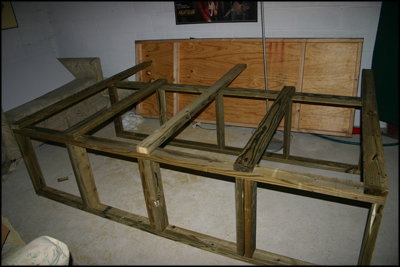
Going back to the double leveled enclosure, once you've made the two top and two bottom frame pieces and cut four 2' and three 75” vertical support boards for each side, you can attached them to one side according to the plans. Once this in complete, attach two of the 75” legs to the other side for support during flipping.
One side of vertical frame supports and legs attached to the double leveled enclosure unit.
As with the other cage, I recommend you flip the enclosure upside down and attach both 2'x8' pieces of 1/8” expanded PVC bottoms. Once those are attached, you can flip the cage again so you can place the two 2'x8' pieces of corrugated plastic backings on between the rear vertical supports and legs. As before, I recommend you put casters on the legs before standing the cage upright.
This photo shows the attached plastic back pieces and all vertical supports and legs for the back side of the cage.
As with the other caging unit, you will need to place 2x4 inserts to fill the gaps where the corrugated plastic dividers will go. Each piece will be 17” long.
This photo shows the front of the enclosure with gap filling 2x4 pieces inserted along the back of the bottom cage level but not the top.
Once the enclosures are standing up, you'll need to insert runners for the corrugated plastic dividers to run along when they are placed inside the enclosure. For this, I used Lattice End Caps and attached them with a hot glue gun.
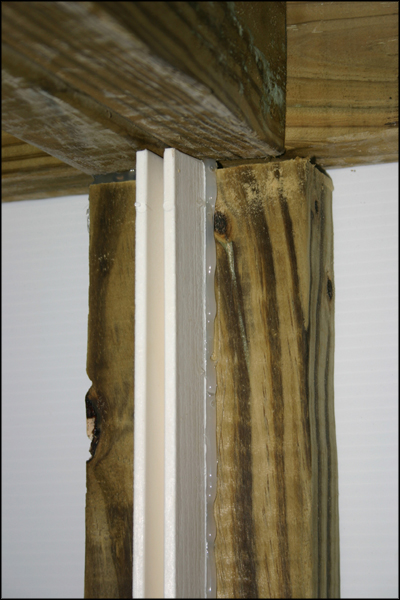
This photo shows the lattice end cap glued such that when the corrugated plastic divider is inserted, it will slide into the space creating a runner.
Once both sides of the runner system are installed, I cut the corrugated plastic dividers to fit and insert them. You will need to cut the corrugated plastic such that the internal braces run horizontal. This will allow you to bend the plastic to the side without damaging the structural integrity of the supports.

This corrugated plastic dividers need to be cut so the internal supports run horizontal. This will allow you to bend each divider.
Once inserted, I place an additional lattice end cap piece along the bottom and attach it as well.
This photo shows the corrugated plastic divider inserted and a bottom lattice end cap piece placed so it can be secured with hot glue.
This will need to be done 3 times for the single leveled enclosure unit and 6 times for the double level enclosure unit.
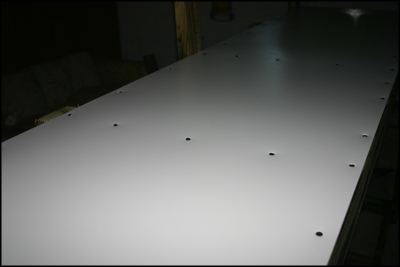
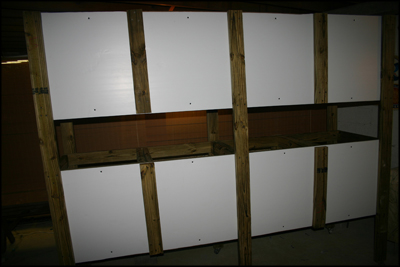
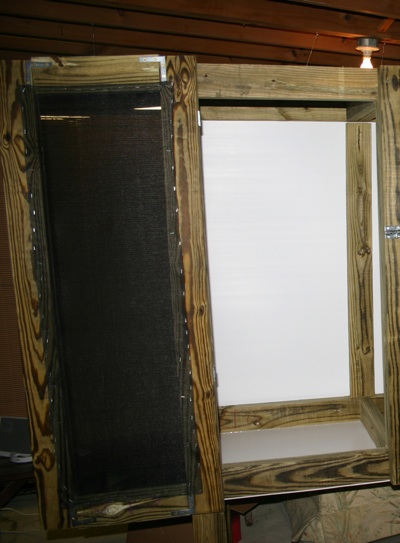
You will now need to pet screen, or another wire mesh of your choice, to each of the top squares for each enclosure level. These can be attached effectively with a staple gun but you'll need to make sure you don't block the divider channels. I used pet screen because it isn't sharp, it hard to tear or cut and is somewhat flexible.
Pet screen can be stapled to the top squares for each enclosure level making sure not to block the divider channels.
At this point, you should start to build doors. After carefully measuring for variation in dimensions, you should start building your doors at the appropriate size. Theoretically, the space for each door on the single level enclosure unit should be about 4'x19.5” and the space for each door on the double level enclosure unit should be about 2'x19.5” but you should measure to be sure. The frame can be connected using L-brackets and then a diagonally inserted screw in each corner for added stability.
L-brackets and a diagonally inserted screw in each corner are used to build each door frame.
Once the door frame is build, you should use a pair of hinges per door to mount the doors. You can attach whatever door handle and latch you wish to each door and once mounted, pet screen can be secured with a staple gun from the inside so as to produce a clean exterior.
Pet screen can be attached from the inside to produce a clean exterior.
In order to provide drainage in the enclosure, I recommend you use hot glue around the base of each individual cage unit base where the wood meets the expanded PVC. This will prevent water from getting between the two and with the weight of a plant in the bottom a low point will be formed at the center of the 2'x2' base where water can be drained from.
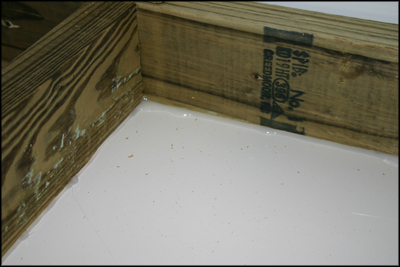
Hot glue should be used around the base of each individual caging unit to prevent water from getting between the wood and the expanded PVC bottom.
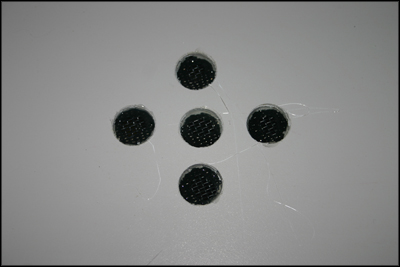
Using a drill bit for making 3⁄4” holes, I drilled out 5 holes in the center of each individual cage bottom.
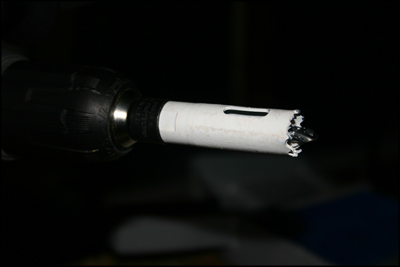
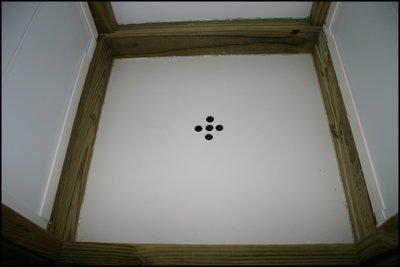
Five 3⁄4” holes are drilled into the center of each individual cage bottom.
At this point, you should attach a piece of screen to the top of a small funnel for each cage using hot glue.
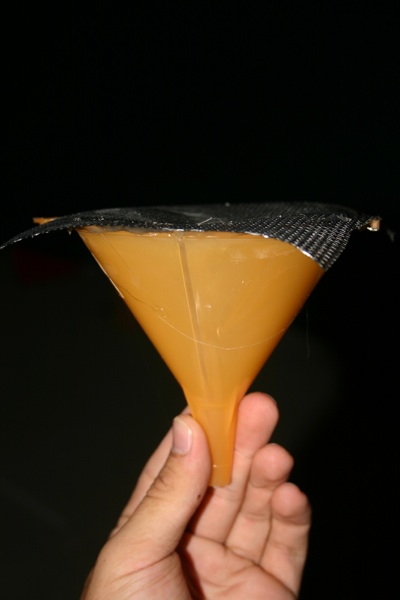
Hot glue is used to attach screen to the large end of a funnel for each individual cage.
Each funnel should then be attached to the bottom of the expanded PVC so that it covers the 5 holes drilled into the center. The funnel will prevent water from running along the under side of the PVC and dripping anywhere you don't intend it to. You'll notice that they should line up down the length of the enclosure.
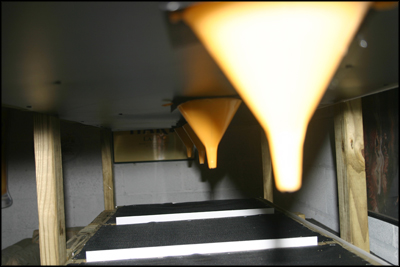
Funnels attached to the bottom of the expanded PVC around the drilled holes line up down the length of the enclosure.
Once attached, you should use hot glue along the edges of the holes to make sure there is no room for anything to get between the screen and the expanded PVC.
Hot glue is used to make sure the screen and expanded PVC are free of gaps between them.
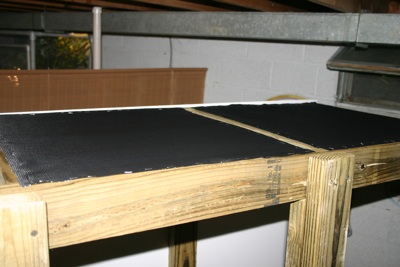
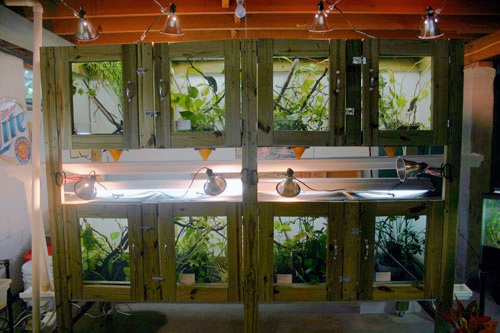
Finally, you can mount supports between the legs using 2x4 wood to hold a gutter that will run along the length of the cage for the funnels to drain into. With one end a couple inches lower then the other, you can have the water drain into a collection bin for easy removal. On the double leveled enclosure, you will have a gutter under each enclosure level.
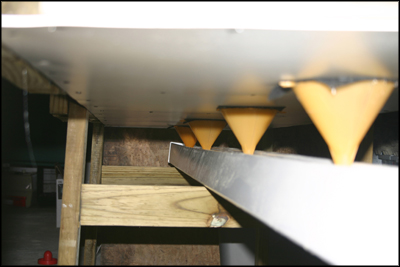
Gutter mounted to collect water from funnels.
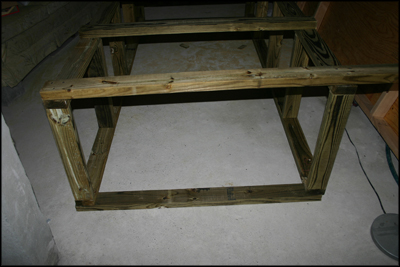
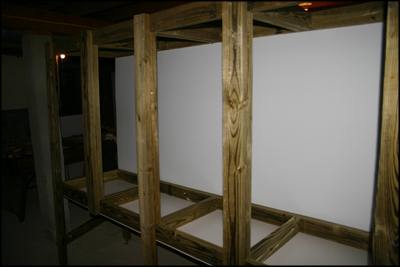
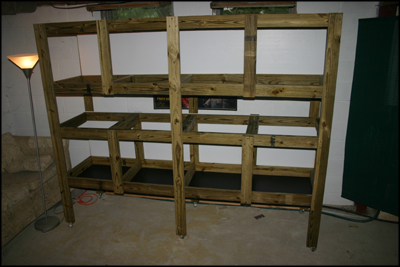
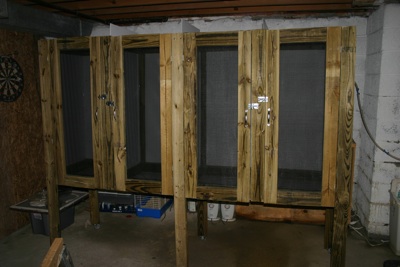
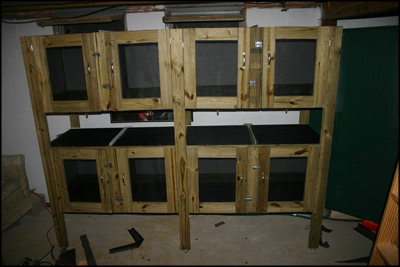
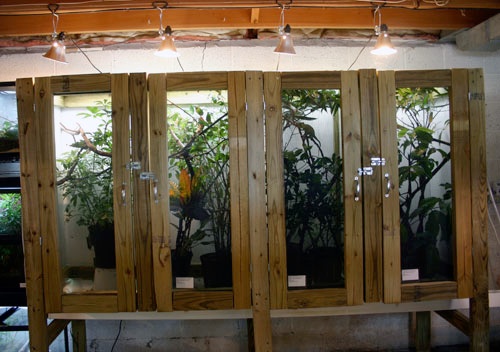
With the single leveled enclosure unit, you have the ability to have four 2'x2'x4' enclosures, one 2'x8'x4' enclosure, two 2'x4'x4' enclosures or one 2'x2'x4' enclosure and one 2'x6'x4' enclosure. With the double leveled enclosure unit, on each of the two levels you have the ability to have four 2'x2'x2' enclosures, one 2'x8'x2' enclosure, two 2'x4'x2' enclosures or one 2'x2'x2' enclosure and one 2'x6'x2' enclosure. In both cases, you can introduce pairs for breeding in adjacent enclosures simply by removing their divider and adding a couple branches between the two territories. Drainage is easily accomplished in an efficient to maintain way and with the top and front being screen mesh, air flow in the enclosure occurs while the solid sides and back help boost humidity without many of the potential stresses of glass. While misting schedules should be adjusted to ensure the enclosure dries out fully between misting cycles, in most climates there should be sufficient airflow with two screened sides that little alteration from an all screen enclosure misting schedule would be needed. Finally, the cage is conveniently sized to require two 4' fluorescent hoods across the length of the cage for each level maximizing your ability to use bulbs.
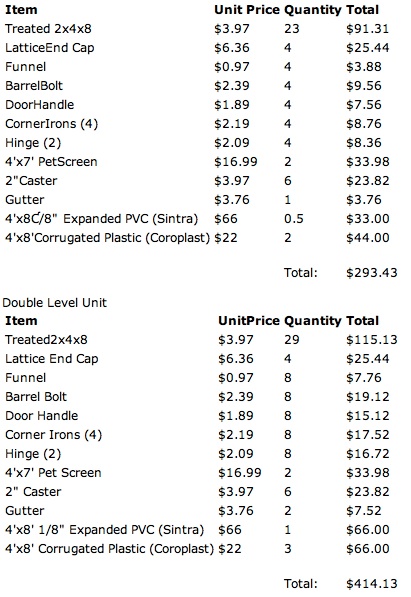
Approximate Costs (not including screws, hot glue sticks, staples, tools or tax)
At the end of the day, even though I'm definitely no carpenter, I came out with two cage units that I was quite pleased with. With three solid white sides, the cages reflect a fair amount of light causing the enclosures to seem brighter for the animals then many fully screen enclosures and thus far, my animals seem to like their new setups.
I hope this do-it-yourself guide to these two enclosure will help some of you or at least give you additional ideas for your own design. Best of luck!

Christopher V. Anderson

Chris Anderson is a herpetologist currently working on his Ph.D. at the University of South Florida after receiving his B.S. from Cornell University. He has spent time in the jungles of South East Asia, among other areas, aiding in research for publication. He has previously traveled throughout Madagascar in search of, and conducting personal research on, the chameleons of the region. He has traveled to over 35 countries, including chameleon habitat in 6. Currently, Chris is the Editor and Webmaster of the Chameleons! Online E-Zine and is studying the kinematics and morphological basis of ballistic tongue projection and tongue retraction in chameleons for his dissertation. Chris Can be emailed at Chris.Anderson@chameleonnews.com or cvanders@mail.usf.edu.


Join Our Facebook Page for Updates on New Issues:
© 2002-2014 Chameleonnews.com All rights reserved.
Reproduction in whole or part expressly forbidden without permission from the publisher. For permission, please contact the editor at editor@chameleonnews.com
